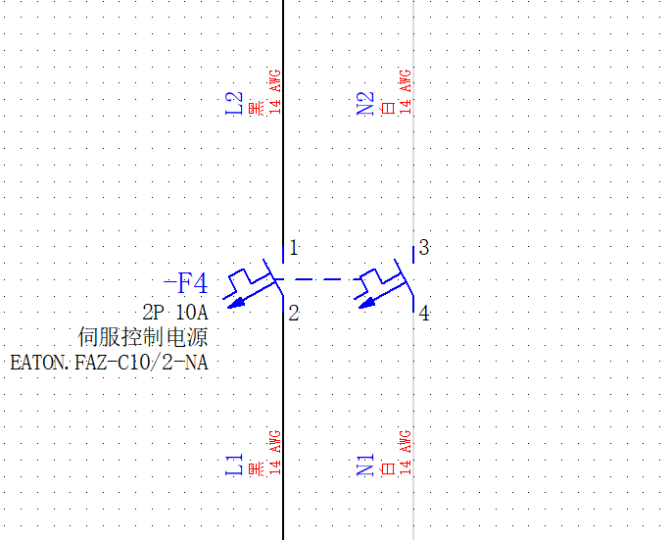


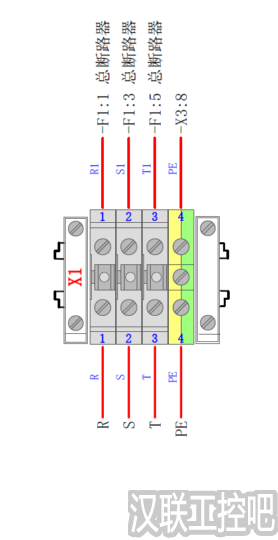
在EPLAN中如何标记记导线颜色和线径,才能实现下图的效果呢?
![图片[1]-EPLAN标记导线线号、颜色和线径](https://han-link.cn/wp-content/uploads/2023/04/EPLAN标记导线颜色和线径1.png)
操作步骤如下:
1.首先使用连接定义点功能去定义相关导线
![图片[2]-EPLAN标记导线线号、颜色和线径](https://han-link.cn/wp-content/uploads/2023/04/image-1.png)
2.左键点击选择连接定义点,然后导线相应的位置左键点击放置,然后在弹出窗口进行相关设置
![图片[3]-EPLAN标记导线线号、颜色和线径](https://han-link.cn/wp-content/uploads/2023/04/image-2-1024x664.png?v=1681128375)
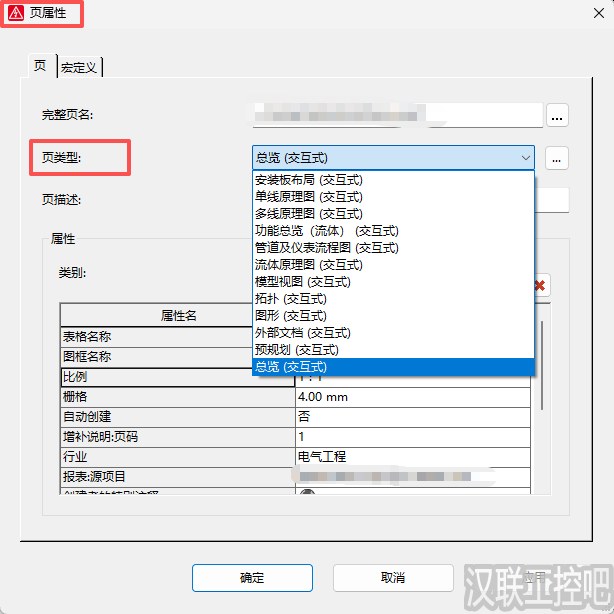
3.选择“显示”选项,按照下图进行相关设置
![图片[4]-EPLAN标记导线线号、颜色和线径](https://han-link.cn/wp-content/uploads/2023/04/image-4.png)
![图片[5]-EPLAN标记导线线号、颜色和线径](https://han-link.cn/wp-content/uploads/2023/04/image-1024x851.png?v=1681128818)
![图片[6]-EPLAN标记导线线号、颜色和线径](https://han-link.cn/wp-content/uploads/2023/04/1681128986422.png)
![图片[7]-EPLAN标记导线线号、颜色和线径](https://han-link.cn/wp-content/uploads/2023/04/image-5.png)
![图片[8]-EPLAN标记导线线号、颜色和线径](https://han-link.cn/wp-content/uploads/2023/04/image-6.png)
![图片[9]-EPLAN标记导线线号、颜色和线径](https://han-link.cn/wp-content/uploads/2023/04/image-7-1024x851.png?v=1681129680)
4.完成后点击“确定”,就能实现到下图的效果了
![图片[10]-EPLAN标记导线线号、颜色和线径](https://han-link.cn/wp-content/uploads/2023/04/image-8.png)
5.可以调整显示方向,旋转90°,双击连接定义点
![图片[11]-EPLAN标记导线线号、颜色和线径](https://han-link.cn/wp-content/uploads/2023/04/image-9.png)
![图片[12]-EPLAN标记导线线号、颜色和线径](https://han-link.cn/wp-content/uploads/2023/04/image-15.png)
![图片[13]-EPLAN标记导线线号、颜色和线径](https://han-link.cn/wp-content/uploads/2023/04/image-10.png)
6.我们可以保存配置,下次可以直接选择该配置,就没这么麻烦了
![图片[14]-EPLAN标记导线线号、颜色和线径](https://han-link.cn/wp-content/uploads/2023/04/image-11.png)
![图片[15]-EPLAN标记导线线号、颜色和线径](https://han-link.cn/wp-content/uploads/2023/04/image-12.png)
![图片[16]-EPLAN标记导线线号、颜色和线径](https://han-link.cn/wp-content/uploads/2023/04/image-13.png)
![图片[17]-EPLAN标记导线线号、颜色和线径](https://han-link.cn/wp-content/uploads/2023/04/image-14.png)
你学会了吗?
© 版权声明
您必须遵守我们的协议,如果您下载了该资源行为将被视为对《免责声明》全部内容的认可,本网站资源大都来自原创,也有少部分来自互联网收集,仅供用于学习和交流,请勿用于商业用途。如有侵权、不妥之处,请联系站长并出示版权证明以便删除。敬请谅解! 侵权删帖/违法举报/投稿等事物联系邮箱:hanlink@189.cn
THE END


暂无评论内容